Sunday, August 9, 2020

Joyful Holly CAS Sketch Challenge # 384

 I loved the Joyful Holly stamp set from the new 2020 Aug - Dec Mini Stampin' Up catalog the moment I saw it.  I loved the elegant simplicity of the holly and knew it would make fabulous 'simple' Christmas cards. 

I made this card for a Sketch Challenge - CAS(E) this Sketch # 384 HERE.  I do love a clean and simple card, even though most of my cards end up being more involved than when I first start out designing it.

This stamp set is photopolymer which means it is clear and easy to line up for the outline and fill-in stamps.  When using a photopolymer stamp set, it is advisable to use a pad or a Stampin' Pierce Mat (see links below) to give a bit of a cushion so that you will get a much better impression when stamping with photopolymer stamps. 

I only used 2 ink pad colors for this card (another great point for Clean & Simple card making).  Garden Green and Real Red.  The Joyful Holly stamp set has 2 different holly branches, a larger one and a smaller one, each with an outline stamp and a stamp with just the holly leaves to fill in the outline.  For the outline, I inked up and stamped the outline stamp in Garden Green.  For the fill-in of the holly leaves, I inked up the stamp and stamped off once on scratch paper then lined it up to stamp on the card front.  This gives a lighter color look. 

The card base is the thicker Whisper White cardstock which is great for card bases and is a sheet of Thick Whisper White cut in half in 'portrait' orientation, 4 1/4" X 11" and scored & folded in half at 5 1/2" on the 11" side.  The Whisper White panel on the card front is regular weight Whisper White cardstock and is cut at 3 3/4" X 5", and the red mat layer behind the white is cut at 3 7/8" X 5 1/8".  I used Stampin' Seal tape runner to adhere these two layers together.  You can use your adhesive of choice. I inked a sentiment from the Joyful Holly stamp set in Real Red and stamped it directly on the card front. I then put Stampin' Dimensionals on the back of the red layer to give it more dimension before putting it on the card base. A very simple and very elegant card.

I also stamp something on the inside besides the inside verse.  For this card, I inked up the outline stamp and stamped off on scratch paper to give a lighter impression on the holly leaves.  I did the same for the holly berries. I stamped the inside verse in Real Red directly on the card without stamping off.

Thank you for stopping by my blog today!  I hope you will come back again soon!


If you would like to order any of the items I used on my card today, just click on the pictures below to be taken to my online Stampin' Up store and you can add them to your cart. If you live in the United States and do not already have a Stampin' Up demonstrator, I would love to be yours!


Saturday, August 8, 2020

Poinsettia Petals card

 I absolutely LOVE the new Holiday Mini Catalog this year!!  Oh. Wait...  The 'real' name is 2020 August-December Mini Catalog.  But it will always be 'The Holiday Mini' to me.  And I know a lot of people feel that way too.  

Anyway....  The Poinsettia Petals Suite was one of my first purchases when the Holiday Mini became available for Demonstrators to order from.  I will no doubt make a lot of cards using this suite of products.


 I used Real Red cardstock cut at 4 1/2" X 11" and scored and folded at 5 1/2".  I stamped the poinsettias from the Poinsettia Petals stamp set (3 different sizes of poinsettias) on Real Red cardstock using Versamark ink pad.  I then used Gold embossing powder and heat set them with my heat tool.  I did the same with the poinsettia leaves only stamped them on Garden Green cardstock.  I then die cut the poinsettia petals and green leaves using the Poinsettia dies, also part of this suite.  For the sentiment, I stamped the Merry Christmas from the Poinsettia Petals stamp set using Versamark ink on a scrap piece of Whisper White cardstock and them used the gold embossing powder & heat set it as well.  I cut a strip of Real Red cardstock 5 1/4" X 1/4" for the skinny strip behind the sentiment.  The vellum piece is also from the Poinsettia Place suite of products.  It is from the Plush Poinsettia Specialty Paper.  There are 3 different papers in this pack and they have flocked designs and are ohhh soooo pretty!!  The vellum layer is cut at 4" X 5 1/4". When using vellum, you can't tape the vellum unless you 'hide' the tape, or else the tape will show on the front of the vellum.  So, to hide the tape, I used Stampin' Seal tape behind the flower and behind the red strip across the bottom to adhere the vellum to the red cardstock.  I then used Stampin' Dimensionals to pop up the flower petal layers.  I also used Mango Melody Stampin' Blend marker to color the Beaded Pearls center for the poinsettia.

I always decorate the inside of the card as well.  The inside sentiment is from the same Poinsettia Petals stamp set.  I stamped the verse in Versamark ink and embossed with gold embossing powder & heat tool.  Here is the inside:

The inside poinsettia was stamped with Real Red stampin' pad and the center was stamped using Crushed Curry stampin' pad. The inside poinsettia is the same stamp that I used for the top layer (smallest) of the poinsettia on the front of the card.

Thank you for stopping by my little corner of the world today.  If you would like to take a closer look or would like to purchase any of the items used to make this card, please click on the pictures below and it will take you to my online Stampin' Up store.  Please feel free to contact me if you have any questions.  My contact information is at the top of my online Stampin' Up store.  If you live in the United States and do not already have a Stampin' Up demonstrator, I would love to be yours!


Framed For You color challenge

Here is a card I made for a Color Challenge. Flirty Flamingo, Mango Melody, Granny Apple Green & Early Espresso. These colors make a bright & cheerful card!

Card base is Granny Apple Green cut at 5 1/2" X 8 1/2" and scored & folded at 4 1/4".  Whisper White front layer is 3 1/2" X 5" and the Early Espresso mat behind the white layer is 3 5/8" X 5 1/8".

I stamped all over the front whisper white panel to make my own DSP ( Designer Series Paper = background).  I had to trim a little strip off the front panel so I thought why not attach it to the inside?  Use every little bit you can! 


The white layer started out at 3 3/4" X 5" and I realized it was too wide after I finished stamping my homemade patterned background so I cut off 1/4" from one side and adhered that to the inside of the card, so I didn't have to waste it.  It was just too pretty even for a little wisp of a strip.  See?  Mistakes are just unintentional design alterations! 😁  The photo below shows the strip I put along the side on the inside of the card. The inside white panel is cut at 5 1/4" X 4".


Stamp set used is Framed For You in current Stampin' Up annual catalog. Early Espresso die cut borders on sentiment is from Ornate Border dies also in the current Stampin' Up annual catalog. I stamped off twice on scratch paper before stamping the flowers on the sentiment piece to make it lighter and colored in the flower centers with Bronze & Light Mango Melody Stampin' Blends markers.

Glad you stopped by today and I hope you can come back soon!

If you would like to purchase any of the products I used to make this card, please click on the pictures below and it will take you to my Stampin' Up online store.   If you live in the United States and do not already have a Stampin' Up demonstrator, I would love to be yours!  Thanks!


Saturday, August 1, 2020

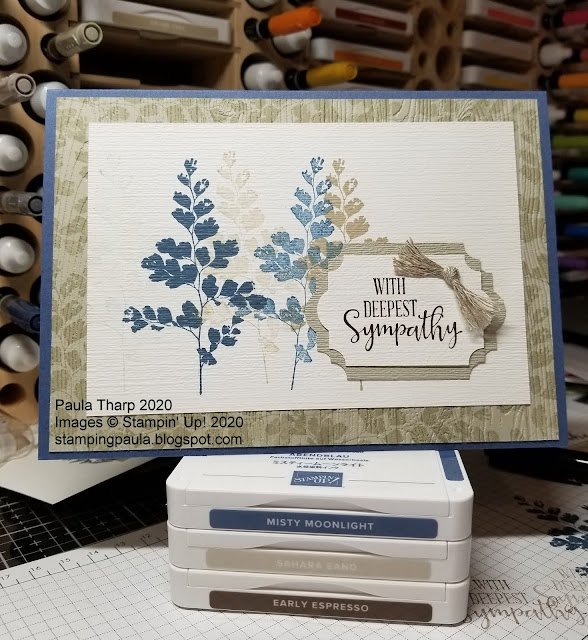
Sympathy : Positive Thoughts stamp set

It's always so hard to make sympathy cards....  My husband needed a sympathy card for work for a coworker's family member that had passed.

I've always loved the Positive Thoughts stamp set (item # 151490) since it came out in the Occasions catalog in Spring of 2019. The sentiment is from Peaceful Moments stamp set (item # 151595) which is a sentiment set that I use quite often. The sentiment is stamped with Early Espresso ink.


When I make cards for my husband to pass around at his work, I always make them 5" X 7" and with 2 extra pages inside to have enough room for everyone to sign. I cut down a regular sheet of 8 1/2" X 11" cardstock to 7" X 10" and I score at 5" while in 'landscape' orientation, on the 10" side.  This makes a 5" X 7" card base.

The card base Misty Moonlight and is a brand new In-Color for 2020-2022.  The tan layer is Sahara Sand and is stamped with Versamark ink around the edges with the same fern stamp on the front of the card and textured with the Pinewood Planks embossing folder. The Whisper White layer is stamped with the fern in Misty Moonlight, twice, (without reinking the stamp in between) and also Sahara Sand ink, stamped twice as well. The white layer was then textured with my Big Shot machine using the Subtle embossing folder.  The sentiment was stamped on Whisper White and punched out with the Everyday Label punch (item # 144668).  I also punched 2 pieces from a Sahara Sand scrap piece with the same punch.  I cut 1 Sahara piece in half width ways and the other piece in half length ways and spread them out on the back to create the border around the white piece. I used 2 pieces of Braided Linen Trim and holding them together, made a knot and frayed the ends and attached it with a glue dot.


I cut the inside pages (blue cardstock base for the inside pages) at 4 7/8" X 7" ( 1/8" narrower, width wise ) and score at 1/4" in from the long side edge to butt up against the center score to fold easier. All of the inside white pieces are cut at 4  5/8" X 6  5/8" and adhered to front & back side of the blue bases for the middle pages.  This gives them room the put money in the card for donations to help the family. I always stamp something on the inside pages also.  For this card, all the left-hand sides are stamped with Sahara Sand and the right-hand pages are stamped with Misty Moonlight.

Here are photos of the inside pages and center scoring so you can see what I mean.


This gives more room in the center of the card for money (donations) to the family.


If you would like to purchase any of the items used in this card, please visit my store by clicking on any of the links below.  Thanks for stopping by and I hope you come back again soon!  If you live in the United States and do not already have a Stampin' Up demonstrator, I would love to be yours!


Tuesday, June 30, 2020

Arrange A Wreath - pastel floral

I love the Arrange A Wreath stamp & die set.  You can make SOOOO much with it!  At least 4-5 occasions and sentiments are included. It really is just about an 'all occasion' stamp & die set.


I started with a card base of So Saffron cut at 8 1/2" X 5 1/2", scored and folded at 4 1/4" on the 8 1/2" side.  To get the design around the edge of the So Saffron card front, I stamped the single leaf stamp from the Arrange a Wreath set with Versamark ink.  Versamark ink is a watermark ink that leaves a slightly deeper color of whatever color you stamp on.  Lovely for a hint of a background.  


For the card front, I used a piece of regular weight Whisper White, cut at 3 1/2" X 4 3/4".  I stamped the wreath from the Arrange A Wreath stamp set in Garden Green onto the white card front.  Then I colored in the white spaces in the leaves with the Granny Apple Green Light Stampin' Blends marker.  I then textured this white piece in my Big Shot die cutting machine using the Bricks & Mortar 3D embossing folder.  I adhered this white card front to a piece of Seaside Spray cardstock cut at 3 3/4" X 5".  I put several Stampin' Dimensionals on the back of the seaside Spray cardstock to pop it up on the card base for more dimension.   

For the flowers, I stamped  the flower stamp in 5 colors: (2 of Flirty Flamingo and 1 of each of the other colors) Flirty Flamingo, Seaside Spray, So Saffron and Highland Heather.I then cut these flowers out using my Big Shot machine and the matching die from the Wreath Builder die set.  The small flower is also a die from the set and I cut those from the cardstock: (2 of So Saffron and 1 of each of the other colors) So Saffron, Highland Heather, Seaside Spray and Flirty Flamingo.  I glued the small flowers to the larger flowers just a dab of glue in the center so when dry, I could fold up the petals on the small flowers to give more dimension.  I put a Stampin Dimensional on the back of each flower as I arranged them on the wreath.  Adding Basic Pearls for the flower centers always sets off a flower!


I used the new punch, Lovely Labels pick-a-punch for the sentiment, stamping a sentiment in Seaside Spray ink onto a scrap of Whisper White cardstock.  Then punching the ends with the Lovely Labels pick-a-punch.  I used a scrap of Seaside Spray 1/2" longer than the white scrap and punched those ends as well for a layering piece behind the sentiment. I added a small bow to the wreath with the Bumblebee gingham ribbon.  LOVE that ribbon!  It goes with so much.  I then added a bit of Wink of Stella clear glitter pen over all the flowers to give them some glimmer.
 
I always stamp something on the inside as well besides a sentiment verse.  Here, I inked up the flower stamp and stamped off once on a piece of scratch paper and then stamped onto opposite corners of the inside whisper white layer.  I did the same with the leaves. The inside whisper white layer was cut at 4" X 5 1/4".


If you would like to order any products used in this project, click on the links below to order from my Stampin' Up store.  If you live in the United States and do not already have a Stampin' Up demonstrator, I would love to be yours!

Thanks for stopping by and I hope you come back soon!


Friday, June 19, 2020

Framed For You


I love this stamp set!  It was on my first order from the new 2020-2021 Annual Catalog.  The Framed For You stamp set can be used in many many ways.  The sentiment is from Positive Thoughts stamp set.  I have a tip for using the Framed For You stamp set.  *DO NOT* throw away the extra rubber stamp frame inside the wood-look frame.  It is just an extra piece and not really meant to be used but this is the piece I used to make the Crumb Cake layer behind the flower.  See photo below.  I inked this piece with crumb cake inkpad then I stamped the woodgrain-look small stamp with Soft Suede and stamped directly on that frame piece that's not really a stamp.  Then I stamped it all together in a Whisper White square and stamped the leafy vine around it. Then layered it on Daffodil Delight mat.  I like to try to find different ways to use stamps besides they way they were intended.


Here is the inside of the card.  I always decorate the insides of my cards.


If you would like to order the items used in this card, just click on the pictures below and it will take you to my online Stampin' Up store.

Thanks for stopping by!  Come back again!  Till then, take care.


Wednesday, June 17, 2020

Ornate Garden

This Ornate Garden Suite has been available for a while, but I just got it this week. I don't know why I waited so long. It's absolutely beautiful! I made this card for a Fab Friday card challenge. It's been several years since I wanted to participate in a challenge. I lost my mojo quite some time ago (years!) and dropped out of Stampin' Up! I rejoined about a year ago and am just now getting in the mood to make cards again.


This card uses the Ornate Garden Designer Series Paper - which is gorgeous, by the way - and the Ornate Floral 3D embossing folder. Cardstock used is Pear Pizzazz and Bumblebee.  I did run the Pear Pizzazz card thru the Big Shot using the Subtle 3D embossing folder.  I love the subtle texture it gives. I used the Tulip punch to make the ends on the sentiment strip.  I used the middle petal on the large tulip on the punch.  The sentiment came from the Peaceful Moments stamp set.  I love finding different ways to use punches & dies to stretch their value.

If you would like to order any of the items used in this card, just click the photo below and it will take you to my online Stampin' Up store.  Thanks for stopping by!


Sunday, June 14, 2020

Blossoms In Bloom Calypso Coral card

I am kind of hooked on the technique of making my own background paper. If this technique is new to you, just stamp all over a piece of plain background cardstock that you want to use with different stamps in different colors.  This technique is great if you don't have any Designer Series Paper to use in a color scheme that you want to go with the card you want to make.


The stamp set used is Blossoms In Bloom from the 2020-2021 Stampin' Up! annual catalog (pg 51). 

The die cut shapes are from Stitched So Sweetly dies from 2020-2021 Stampin' Up! annual catalog (pg179).  The stamp pad colors I used are: Daffodil Delight, Mango Melody, Calypso Coral, Granny Apple Green, Crumb Cake, Soft Suede and Early Espresso.


I ran the stamped background piece thru my Big Shot using the Subtle 3D Embossing Folder and adhered it to a Calypso Coral card base.  For the sentiment, I cut out a shape from the Stitched So Sweetly die set twice, once in Whisper White and once in Calypso Coral.  I then cut the Calypso Coral die cut diagonally as pictured below and adhered the small pieces to the back of the whisper white die cut to give the shadow effect. 


The ribbon I used is from the Forever Greenery Trim combo pack from the 2020-2021 Stampin' Up! annual catalog (pg 161).  I then popped up the sentiment piece with Stampin' Dimensionals and put 5 Basic Pearls on the end of the ribbon.


To order any of the items used in the card above, please visit the links provided below for my Stampin' Up! store:


Thursday, June 4, 2020

Beautiful Friendship background


Beautiful Friendship stamp set (item # 149252) was used to create my own background DSP.  You can come up with very unique patterns and color combinations.  I hadn't used this technique for quite some time and forgot how fun it is! I started out with plain whisper white cardstock and stamped all over creating my own "Designer Series Paper" using Beautiful Friendship stamp set.  I cut the same die cut from blackberry bliss & whisper white using the Stitched So Sweetly die set (item # 151690).  I cut the blackberry bliss piece in half horizontally and staggered the top & bottom to create the shadow for the white die cut layer. I colored the bow with the pear pizzazz ink pad. I ran the white background layer thru the Big Shot with the Subtle embossing folder.  Ink colors used: Balmy Blue, Highland Heather, Blushing Bride, Pear Pizzazz, Soft Sea Foam, Daffodil Delight and Sahara Sand. All items used are © Stampin' Up!


Monday, July 30, 2012

Cinnamon, watching the traffic go by ...

This is my baby, Cinnamon.  He is such a cutie, isn't he??  He likes to sit in the chair by the front door and watch the traffic go by, and the birds in the tree.  He thinks that everything happens just for his entertainment.  LOL!